You’re stranded in the wilderness with only one bar and a text that won’t send. You also happen to have 32 feet of aluminum foil. Why you have it, I don’t know — but you think to yourself: Could I use this to boost my cell signal somehow?
I don’t know why you had that aluminum foil out in the wilderness either. But it’s a solid idea rooted in real science — a 2017 Dartmouth study proved that aluminum foil or other metallic surfaces can optimize wireless signals. I’ve tested this theory before, first by boosting and then blocking Wi-Fi signals using aluminum foil. This time, it’s my iPhone’s turn.
I tried building a cell-signal booster out of aluminum foil, and here’s what happened.
What does aluminum foil have to do with signal strength?
Where the idea comes from
After experimenting with aluminum foil to both boost and disrupt my home Wi-Fi signal, I started wondering if it could do the same for my phone. What sparked the idea was a childhood belief that tin-foil hats really could block unwanted signals. While I’m no longer a member of that committee, I was thinking about Faraday cages — those conductive enclosures used to block electromagnetic fields. If metallic surfaces can confine signals, can they also control them? Enter the amplification hypothesis.
Aluminum is highly conductive. When an electromagnetic wave hits its surface, free electrons inside the metal start moving almost instantly, generating a counter field that cancels the wave inside the metal and bounces it back outward. In essence, it reflects it or blocks the wave from moving through it.
My DIY amplifier borrowed its shape from a satellite dish, which collects faint signals from the space around and focuses them onto a receiver. The curved metal surface reflects incoming radio waves toward a focal point, where they’re amplified. In my experiment, I wanted the aluminum parabola to collect the radio waves and focus them towards my phone’s antenna.
How I measured my signal strength
With Field Test Mode
You can roughly estimate your signal strength by finding the ascending bars beside your network carrier (like AT&T or Verizon) and cellular network tech (like LTE or 5G), usually at the top of your phone’s screen. There’s typically only those four “bars” that give you a general idea of how strong your signal is. The more bars, the stronger the signal. If there are no bars at all, well, that’s when you usually see someone walking around holding their helpless phone to the sky in a desperate hope to grab some kind of connection.
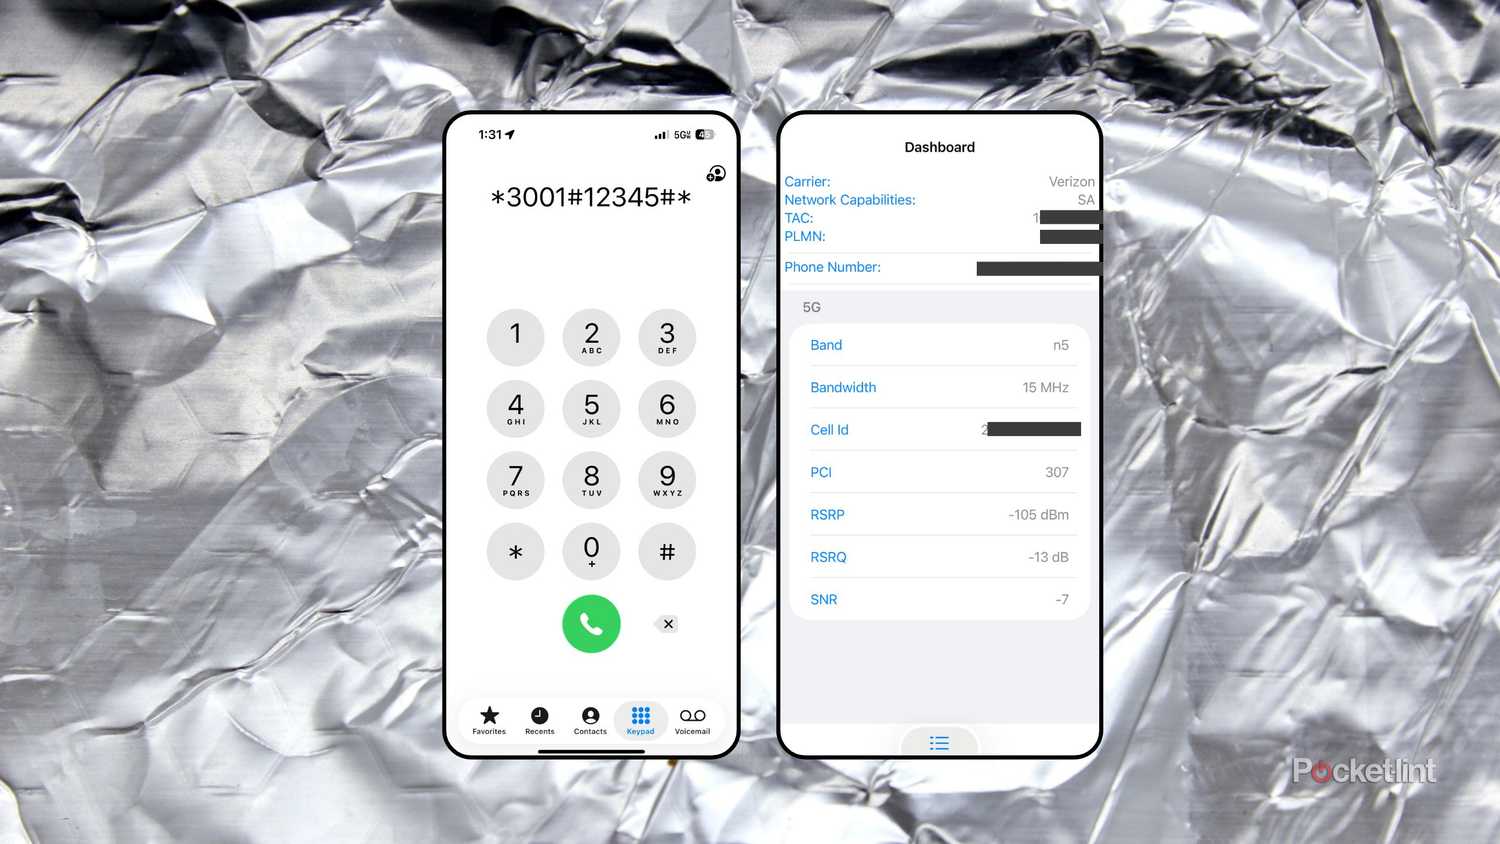
However, there’s a secret native feature on most phones called Field Test Mode (or a field test display) that lets you see a more detailed breakdown of your network’s information. While there’s a variety of acronyms and parameters that the everyday person might scratch their head at, anyone can access it by dialing *3001#12345#* into their phone app. For the sake of this experiment, I used Field Test Mode (on iOS) to see how my signal strength changed in real time before and after using my homemade aluminum foil amplifier.
The parameter I’m most interested in is RSRP, or Reference Signal Received Power. It’s an indicator of signal strength, and you usually want to see it range from -50 dBm to -120 dBm (decibel milliwatts). The higher the number, the stronger your signal — but keep in mind that the numbers are negative, so a signal sitting at -60 dBm is much better than one reporting at -102 dBm.
While field test mode can be used to accurately measure your phone’s signal strength natively, it is not the same as a signal strength app or a speed test app, like I’ve used in prior experiments to test my Wi-Fi router’s speed.
Now, there’s the matter of your signal quality, which we can see by measuring RSRQ, or Reference Signal Received Quality. RSRQ usually sits between 0 dB and -20 dB (decibels). Again, the closer you are to zero, the better the signal quality. You can also look at SINR (Signal-to-Interference-Ratio) as it’s another good indicator of signal quality.
Band (the frequency range being used) and Bandwidth (how wide the communication channel is) are also good indicators we’ll look at.
What happened when I put my iPhone in a homemade aluminum foil signal amplifier?
The process and the results
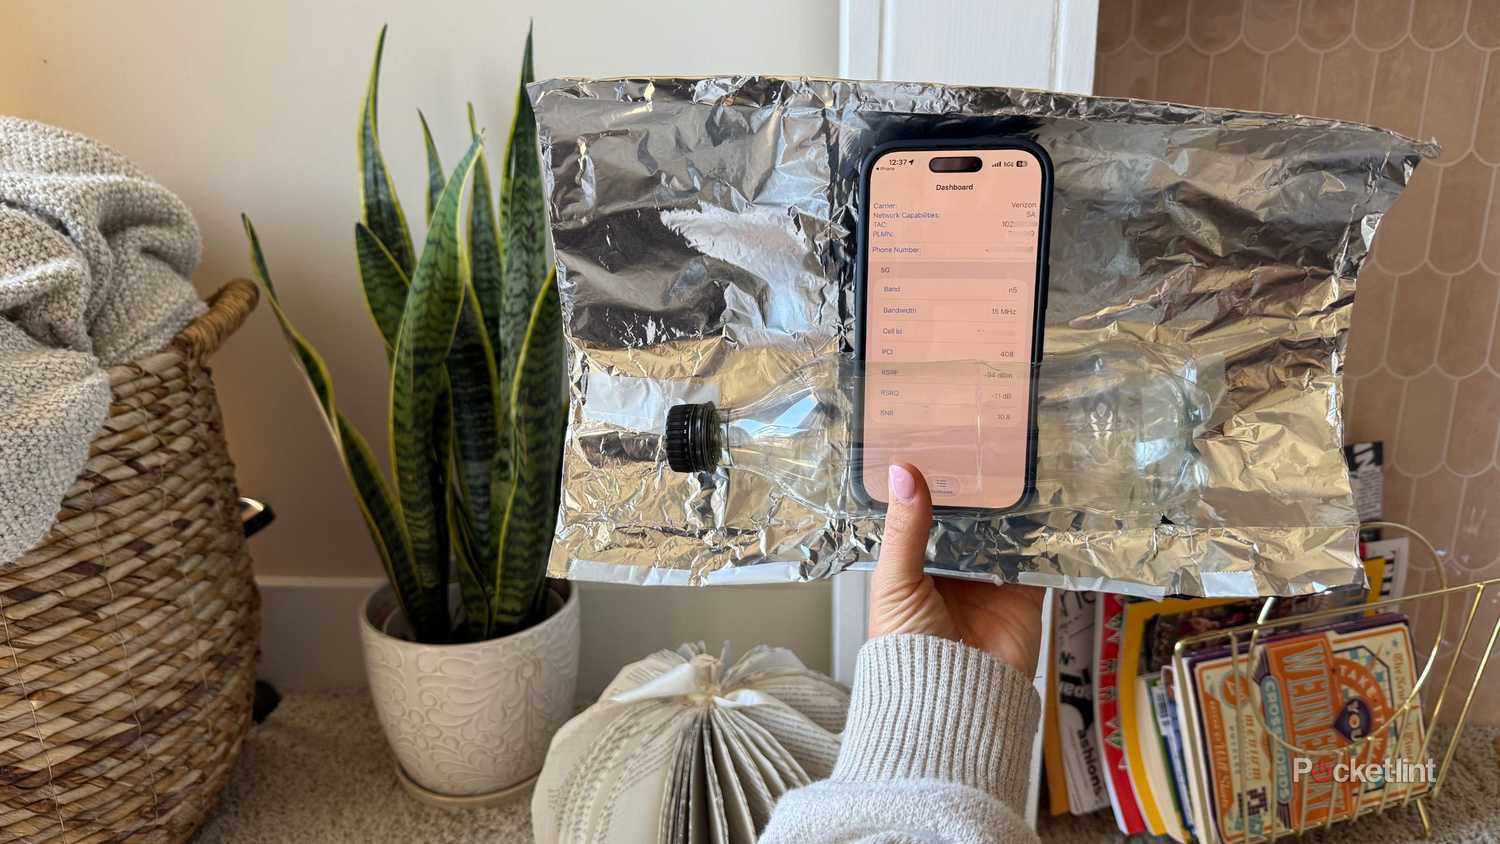
To create the amplifier, I cut the tops and bottoms off three aluminum cans, flattened them out, and taped them together. I then covered the sheet with aluminum foil (shiny side out) and smoothed it as best I could. After cutting an iPhone-sized slot into an empty Coca-Cola bottle, I taped both ends to the foil sheet and bent the assembly into a shallow parabola.
Without a proper laboratory, it’s difficult to remove all creases and wrinkles from the aluminum foil, which makes this a less than perfectly controlled experiment. However, I’m performing it with real-life practicality in mind, so it’s a test aligned with a true, real-world scenario.
Now, I was ready to perform the field test. My network carrier is Verizon, and I just happen to sit smack-dab in the middle of three Verizon cell towers. Luckily, I have a direct line of sight to the one in front of my window, which lets me aim my amplifier directly at it for the experiment.
Using the field test tool, I located a part of my apartment where my signal strength was consistently the lowest. This is what I measured with and without my homemade amplifier:
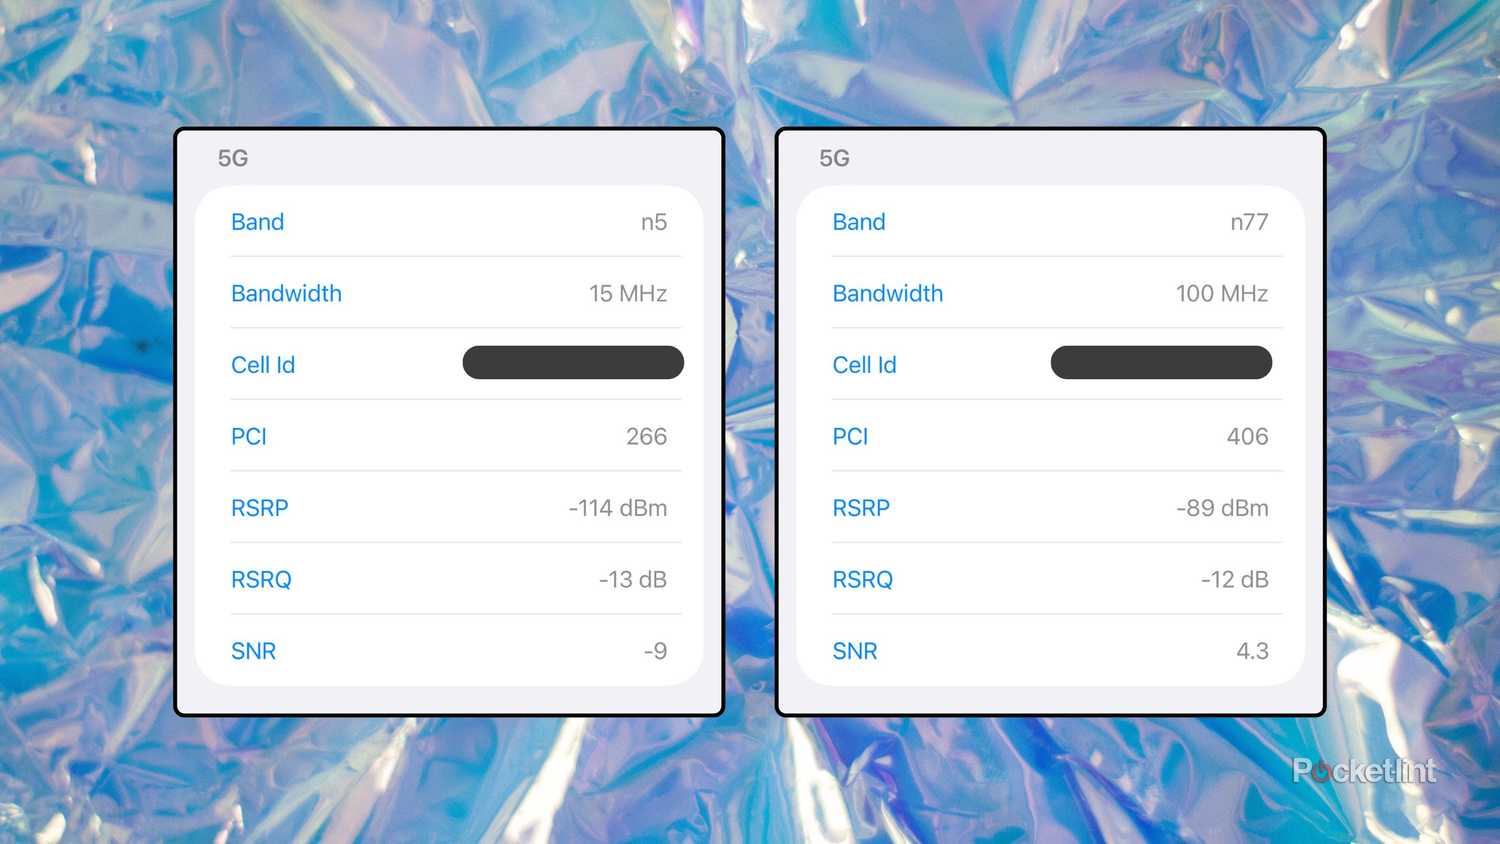
Without the amplifier, my phone connected to an n5 low-band 5G frequency with a narrow 15 MHz bandwidth. The RSRP sat at –114 dBm, which is considered very poor. The RSRQ came in at –13 dB (average quality), and the SNR at –9 dB, which meant background noise was messing with usable signal.
Now, enter the amplifier. In the same spot, my phone locked onto an n77 mid-band 5G network with a 100 MHz bandwidth. The RSRP improved to –89 dBm — about a 25 dB gain, pushing it into the “good” range. The SNR flipped positive to +4.3 dB, and the RSRQ nudged up slightly to –12 dB, which kept it in the average range.
So, what happened? Based on theory, the foil didn’t actually ‘amplify’ my phone’s signal. Instead, it redirected the existing electromagnetic waves in the air towards my phone’s antenna. Since I shaped the foil in a curved parabolic shape (akin to a satellite dish), if focused what could’ve been scattered radio waves from that cell tower nearby and gave my phone the opportunity to jump up to a faster, higher capacity band.
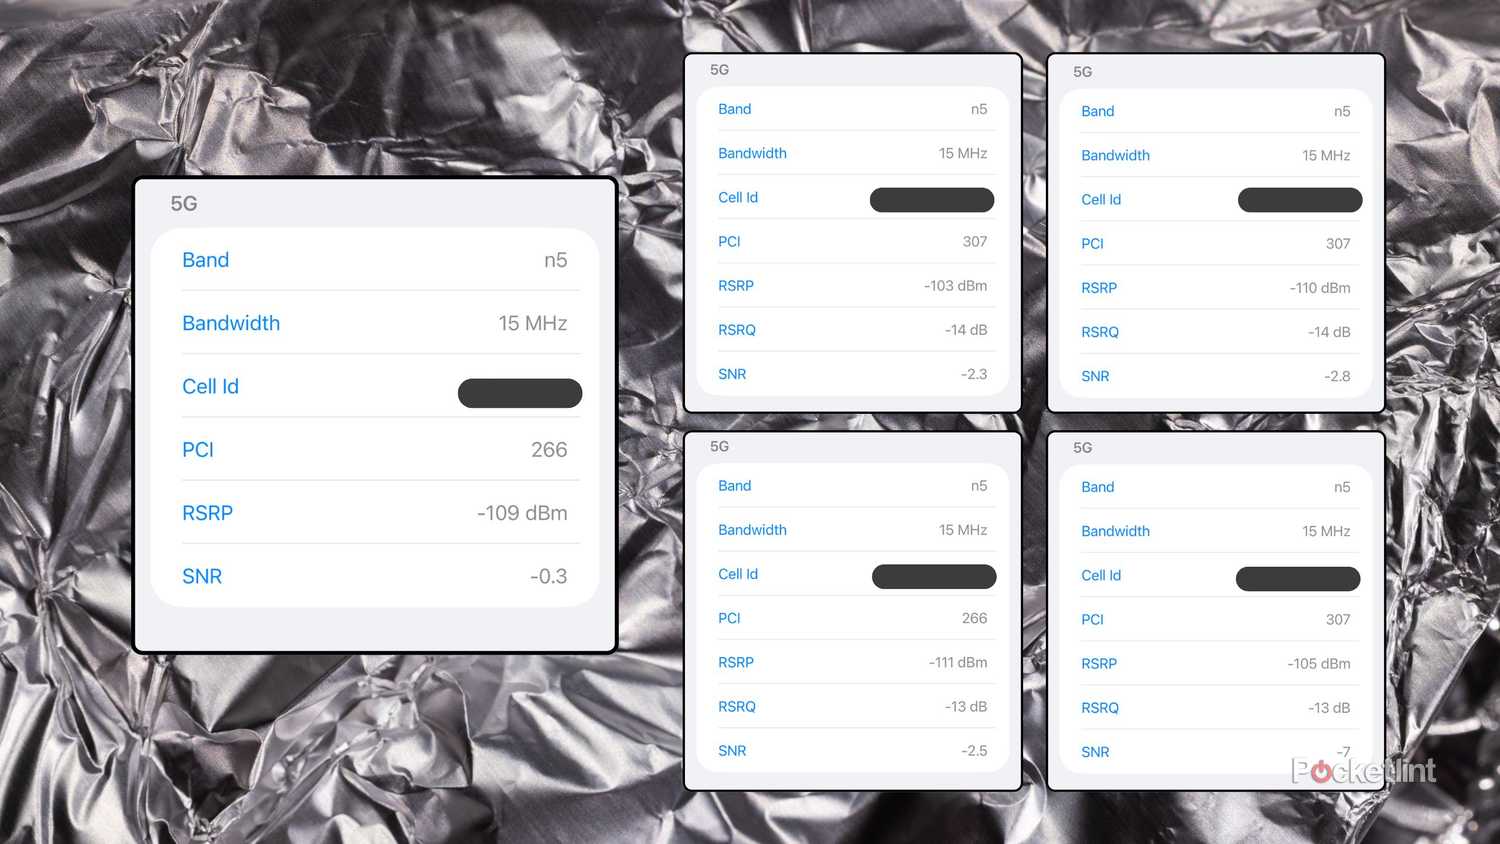
My first test worked surprisingly well, but I wanted to know if the effect would hold up somewhere less forgiving: the back stairwell of my apartment building. Unfortunately, I could barely even get a base read in that spotty spot — my RSRP in particular kept jumping all over the place:
On the left was the most consistent base read I could gather. On the right, I included four of the most frequent reads I gathered in that back stairwell. While at first, the aluminum foil seemed to slightly improve the RSRP in general, a slight movement of my hands threw that result out of whack. It was difficult for me to find the angle that worked there, and after a few minutes I grew frustrated. While it worked up in my apartment (with a clear view of the cell tower, as well), it wasn’t doing squat in a place where I actually struggle to get a signal in real time.
I’m not about to carry that contraption down five flights every day, but the frustration was real — and in an actual emergency, it would be worse.
It’s a perfect example of how the environment matters in an experiment like this. Stairwells are a signal nightmare — made of concrete, steel, metal rails, etc. The radio waves there were already probably an echo chamber of signals, and my amplifier probably only added to the chaos and created more reflections than were there before.
In an ideal environment (like my apartment unit), my DIY amplifier can work nicely. But in anything but, it puts a spotlight on how finicky and fragile the experiment is.
So, is aluminum foil a practical signal booster?
No, it’s not
If I find myself on a barren desert road with nothing but a tumbleweed and two bars, this setup might get me the signal to summon Triple-A. As long as my aluminum is perfectly unwrinkled, there aren’t conflicting signals, and I already have a solid chance of a text going through all on its own.
Aluminum foil doesn’t make more signal. Rather, it just tells existing waves where to go. While it can work in ideal conditions, it’s fragile, unpredictable, and ridiculously easy to misalign — which could actually even hurt your signal rather than improve it. It definitely isn’t a long-term fix to constantly nagging signal woes, either.
If you’re looking for a true signal booster, I’d recommend an official device or even just moving to a better location — even sending that text near a window could improve your chances of getting one or two more bars in general.
Trending Products

Wireless Keyboard and Mouse Combo, ...

Lenovo New 15.6″ Laptop, Inte...

Dell Inspiron 15 3520 15.6″ F...

Acer Nitro KG241Y Sbiip 23.8” Ful...

Wireless Keyboard and Mouse Combo, ...

Zalman i3 NEO ATX Mid Tower Gaming ...

GAMDIAS ATX Mid Tower Gaming Comput...

Sceptre Curved 24-inch Gaming Monit...

Acer SH242Y Ebmihx 23.8″ FHD ...


